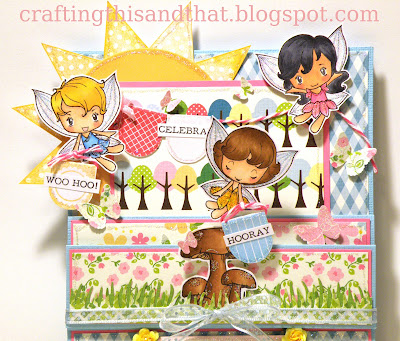
Hi, Hi, Hi! I'm a little excited to share this project. Sometimes when I get an idea and it seems so great in my head, I get all excited that I have to drop everything and push aside whatever I'm working on. Do you get like that too or is it just me? Anyway, after making that easel card HERE that was all flopping around and couldn't fold flat, I wanted to try again. I had linked to the original tutorial HERE. My project is a bit longer but I think it needs that extra length so that it stands nicely and still can fold flat.
This is how it looks folded flat. It's long at 7 inches.
This is how it looks folded flat. It's long at 7 inches.
I tied a ribbon onto the front to help keep it closed and keep the front panel from flapping out too much. I used TGF's clear stamp sets, Bantastic and Fairy Princess.
This is the bottom portion which helps the top to stand. I stamped one of the banners (the one with the heart) in light pink as the background and stamped the sentiments from Fairy Princess over it.
This is how it looks opened. It's kind of busy and there's a lot going on.
Front view.
Side view of the easel and steps. I made graduated steps so you could see the middle panel a bit more too. But it is all one long piece of cardstock. There is also some space to write a message when you flip the top over too.
I made the sun with one of the banners and a circle die too. I added some rounded banners on pink twine in the back. I wanted it to seem as if the fairies were putting together the banners in the background. I added a tiny pink bow that I bought from a store here. I wonder if someone sits there all day making these bows! They are so cute but I don't think I could ever make a bow that tiny.
Pink Fairy. I added stickles on her wings and dress. There's actually a lot of stickles everywhere on this project!
Blue Fairy is holding one of the banners. If you look closely you can see that she is mounted onto clear cardstock because I wanted her to look as if she was flying.
Orange Fairy. She is also holding a banner and mounted on clear cardstock. I borrowed some yellow glitter glue from my youngest. He loves his glitter glue when he crafts too. I had to buy him some after he kept asking to use my stickles!
I did a short little how to in case you wanted to try one too.
I used 2 pieces of cardstock both 5.5 x 12 inches.
Score one piece at 2.5 and 5 inches.
Then fold it like above. This is your base.
Score the second piece at 5, 7, 9 and 10.5 inches.
Fold it like the photo above. This is the top portion. You may want to lay it over your base and see where it naturally wants to rest and stand. I had about 2 inches of the base showing on the bottom and that's where I added my bottom sentiments. Then just decorate and assemble like a regular easel card. Hope it works out okay!
I used thin American Crafts cardstock too (in blue) and the pink cardstock is PTI. The grass die is from MFT and the butterflies from an MS punch.
I'll be entering this in TGF's Monday Fun-day #16 Let's Get Sentimental and Flutter By Wednesday #186 Open challenge.
Sorry, kind of wordy today. Thanks for reading!


Comments
Wow you brought all these wee fairies to fairyland.... How gorgeous is this easel card.... Awesome!!!!!!!!!
Hope to hear from you tomorrow night on SCS!
HUGS