
Fairy Dust is a Must

Hi, Hi, Hi!  I'm a little excited to share this project.  Sometimes when I get an idea and it seems so great in my head, I get all excited that I have to drop everything and push aside whatever I'm working on.  Do you get like that too or is it just me?  Anyway, after making that easel card HERE that was all flopping around and couldn't fold flat, I wanted to try again.  I had linked to the original tutorial HERE.  My project is a bit longer but I think it needs that extra length so that it stands nicely and still can fold flat.

This is how it looks folded flat.  It's long at 7 inches.

I tied a ribbon onto the front to help keep it closed and keep the front panel from flapping out too much.  I used TGF's clear stamp sets, Bantastic and Fairy Princess.

This is the bottom portion which helps the top to stand.  I stamped one of the banners (the one with the heart) in light pink as the background and stamped the sentiments from Fairy Princess over it. 

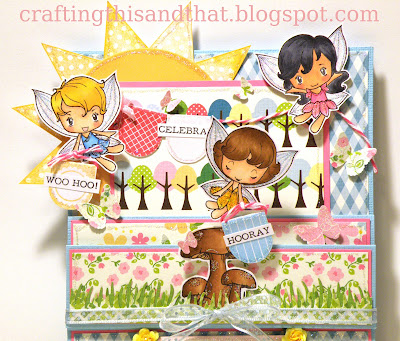
This is how it looks opened.  It's kind of busy and there's a lot going on.

Front view.

Side view of the easel and steps.  I made graduated steps so you could see the middle panel a bit more too.  But it is all one long piece of cardstock.  There is also some space to write a message when you flip the top over too.

I made the sun with one of the banners and a circle die too.  I added some rounded banners on pink twine in the back.  I wanted it to seem as if the fairies were putting together the banners in the background.  I added a tiny pink bow that I bought from a store here.  I wonder if someone sits there all day making these bows!  They are so cute but I don't think I could ever make a bow that tiny.

Pink Fairy.  I added stickles on her wings and dress.  There's actually a lot of stickles everywhere on this project!

Blue Fairy is holding one of the banners.  If you look closely you can see that she is mounted onto clear cardstock because I wanted her to look as if she was flying.

Orange Fairy.  She is also holding a banner and mounted on clear cardstock.  I borrowed some yellow glitter glue from my youngest.  He loves his glitter glue when he crafts too.  I had to buy him some after he kept asking to use my stickles!

I did a short little how to in case you wanted to try one too. 

I used 2 pieces of cardstock both 5.5 x 12 inches.

Score one piece at 2.5 and 5 inches.

Then fold it like above.  This is your base.

Score the second piece at 5, 7, 9 and 10.5 inches.  

Fold it like the photo above.  This is the top portion.  You may want to lay it over your base and see where it naturally wants to rest and stand.  I had about 2 inches of the base showing on the bottom and that's where I added my bottom sentiments.  Then just decorate and assemble like a regular easel card.  Hope it works out okay!

I used thin American Crafts cardstock too (in blue) and the pink cardstock is PTI.  The grass die is from MFT and the butterflies from an MS punch.


Sorry, kind of wordy today.  Thanks for reading!

Comments

Unknown said…
PHENOMENAL!!! LOVE your coloring :)
Now this is a Hi5 Eva!
Wow you brought all these wee fairies to fairyland.... How gorgeous is this easel card.... Awesome!!!!!!!!!
Cheryl said…
super cute scenic card! love the banner idea! the easel part looks neat, i have to try it one day since you did all the thinking and measuring for me! i don't think i have the patience or mindframe to figure stuff like that out.
Sunghee said…
oh my~!!! what a project! Look at all the detail, too! Soooo delightful, too!
Unknown said…
OMG, Eva!!. It's a lovely work!. I love all the little details and all the 'sweet' stamps you've colored so well. Congratulations!!. It's wonderful!! :)
Rachel Parys said…
Fantastic! You never cease to amaze me! Beautiful scene.

Hope to hear from you tomorrow night on SCS!
Lorraine said…
Yowza, another artistic masterpiece by you, Eva! Love the design, papers and your fab coloring!
Annie Rose said…
This is fantastic! I love everything about it. The sun looks amazing. Thank you for the tutorial, this went straight onto my "to-do" list! :)
faithnme said…
OMG. Eva.. First I just want you to know that I will be "scaptlifting" this.. GORGEOUSS!!.. you were quite busy werent you.. Just love how you made the "sun"... and to end with a "tutorial"". WONDERFUL.

HUGS
Rachel Parys said…
Yes! Do check out the challenges! I can only imagine what you will come up with, it's a pretty fun catagory! You will have to check out what I did to poor little Monday, she went through quite a traumatic transformation! he he
Thanh Vo said…
Eva, this just has me going "Ooooo!!" Such a fabulous card. WOW.
RiNNE said…
Wow wow wow! That first pic sure was deceiving! Then I got to the rest and bam!! Such a fancy easel card! Love the fairies and banners! Thnx for the measurements - I'm gonna have to try this :).
Amanda R said…
I think this is awesome and I can see why you were so excited! Great colors and I like how you used the roses to hold the card in place, nicely done. Thanks for joining in this week at Flutterby Wednesdays!
gobeagirl said…
Wow Eva, this is spectacular! I love all your in depth pictures on how you made this. I love seeing everything so up close. Really really cute and I can see why you are so happy with this. Love how it turned out. Thanks for playing along over on the FFF challenge blog. Good luck to you on the Flutterbye Wednesdays as well. Hugs, Lisa G

Popular posts from this blog

Snowman gift card holder

Hi!  I was planning to post this last night but I was just too tired to write or think of complete sentences.  It's been a busy week with the boys on Fall break and still trying to finish up a bunch of crafts.  I have been trying to make some crocheted crafts to put in my Etsy shop and finally I'm done with one.  It's a crocheted snowman that can hold a gift card or anything actually that is small enough to fit in the pouch.  The pattern is designed by ChiWei Ranck of One Dog Woof and can be found HERE . Here's the little snowman with his arms folded over in the front to look like he is hugging the card.  I added this fun card that I stamped.  You can definitely add in a gift card too behind this card. The gift card reaches under his nose. This is how the little opening of the pouch looks.  I hope I can make more of these little guys.  These would be so cute for teachers and I think it would be easy to put a little wire through the hat and then use it as

coffee cup shaped cards

Hi!  I think after this post I may need a little nap!  My right shoulder is actually feeling worn out from all the typing and photo editing I've been doing lately.  And this cooler weather is making me drowsy.  It's getting cold here already! I made a bunch of these coffee shaped cards using a die from Honey Bee Stamps .  It's a cute coffee set but the die is extra long so it would probably help to have a longer platform to diecut.  I just have the standard sized one so I would pass it through once in my Big Shot and then rotate the cardstock and die carefully to cut the other end.  Manageable but the longer platform would be more convenient! I embossed the front of the card with some pretty snowflakes.  I think this is a Sizzix embossing folder.  And then stamped the coffee sleeve with some Lawn Fawn stamps. This is the inside.  The gift card slot does not come with this coffee cup die set.  I cut that opening with one of the dies from MFT's gift card dies.

all occasion tags

Hello!  I have more tags to share today.  I kept these simple too to be used on most any occasion.  They have no sentiments on them. I used MFT's cute Birdie Brown Bitty Bears stamp set.  These were on my wish list for a while and I kept going back and forth about purchasing them especially because I wanted the dies to cut them out too and those were very expensive!  Geez, remember the old days when we used to fussy cut everything out by hand? This is the next 6 tags.  There's also a cute bear with a Santa hat that I didn't include in the photos.  This was a pretty quick project since I kept the bears white!  Not much coloring on these tags but they are still cute and colorful. I thought I was going to be doing more stamping but I've actually gone on to crochet more!  I've made 3 more crochet projects that I'll share soon.  Sometimes I do get the urge to color something but these days it's so much easier to pick up some yarn and my hook and crochet