
Hi! This is my first ever Tutorial Tuesday for The Greeting Farm! Holy smokes! Who thought I'd ever make it onto that DT?! It's just amazing!
Onto my tutorial! This is kind of an extension to a tutorial I did some time ago using felt and dies to make your own embellishments. See HERE if you're interested in seeing that original post. But that got me to wondering what other kinds of embellishments I could create with felt and different border dies. So I experimented and came up with the samples below.
 This is basically how I created all of these felt embellishments. First, cut your felt with your border die. In this case, I am using felt from Papertrey Ink and a Magnolia Doohickey border die. When I cut felt with my Big Shot, I use a shim but nothing fancy. It's just a piece of scrap Papertrey Ink cardstock. The shim helps to give it a cleaner cut.
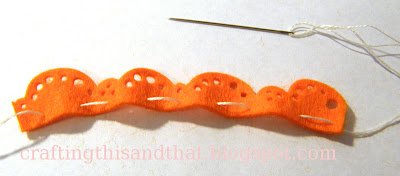 Sew through the felt like above and then pull both ends of the thread til it looks like the photo below and tie a knot.

 How fitting that the wave die would make such a cute starfish! This will show up on one of my cards later!
 Maybe add a little button or rhinestone in the middle?


 This is the card using the embellishments created from the Doohickey border dies. After I added the flowers in the middle, my daughter loved it! Ha! The stamp is TGF's Blush Bettie. Isn't she sweet?
 Well, I hope you'll give this a try. It didn't take me too long to just play around with these. I basically stuck with one color felt except that pink one and took out a variety of border dies. I'm not an experienced sewer. If you can do that simple basic stitch, you can make these embellishments too! Oh, and I used 2 strands of embroidery floss as my thread to sew. I made a few and now have a small stash of these to put on my cards!
Thanks so much for reading!

Onto my tutorial! This is kind of an extension to a tutorial I did some time ago using felt and dies to make your own embellishments. See HERE if you're interested in seeing that original post. But that got me to wondering what other kinds of embellishments I could create with felt and different border dies. So I experimented and came up with the samples below.


My daughter didn't like this one much but after I dressed it up a bit (see my card below) she thought it was pretty!


I thought this one was sweet! It may look familiar if you have seen my card for the latest TGF sketch on Splitcoaststampers.

The most flower-like. This is similar to what I created in my original tutorial.

My daughter thought this one looked funky but I thought it was fun. What if it was the center to my orange flower from above?

And add a little button or rhinestone or pearl?


Thanks so much for reading!

Comments
Have a great day and thanks for sharing!!
Blankina
The felt flower on my card yesterday was from K&Co...if only I had seen this tute one day earlier! LOL!
:Dxx
Great tutorial Eva!!
Arabella
Hope you are having a great day!
;)