
Hi! I've been a bit obsessive lately with PTI's Make It Monday Challenge to partially emboss/deboss. I've made a bunch more stuff but will split them into separate posts just so it'll be easier to read.
My first project was posted here and actually got a shout out on PTI's sidebar! That was fun and actually made all the work and attempts worth it. But since then I've been thinking of ways to make it easier to come up with the same results. I'm a little weary of placing a metal die on top of an impression plate to emboss. I tried it very gently and it left slight scratches on the back side of my die and I'm afraid it would smash down my impression plate so I'll take the more conservative route.
I like the idea of creating a frame as found in this Splitcoast Stampers tutorial on double embossing. For my first card I must have cut up 2 cereal boxes and some corrugated cardboard too. But that was tough! But because I'm a messy kind of crafter I still have lots of stuff from previous projects lying around and I saw my fun foam. And I had this idea to use fun foam for my frame! It's a lot easier to cut and a lot easier to roll through my Big Shot. It's not perfect but passable and I had to still keep a layer of cardboard.
 I started off with all my materials to reduplicate my first card. I cut 3 pieces of fun foam to the size I needed.
 I taped the 3 layers of fun foam together and placed my die over it and also taped it with removeable tape. I only had the 2 mm thick fun foam at this point (also tried it with the 6 mm thick fun foam).
 Run it through and it cuts very easily. And you get fun shapes to play with too. I'll probably give those to my kids to craft with.
 This is just to show how I layered it after moving both tabs up. Clear plate, tan mat (which is the Spellbinders mat), impression plate that you want facing up, cardstock and the frame. Clear plate over that.
 This is how I actually run it through. You can hold tape the frame to your cardstock and tape that onto the impression plate with removeable tape. I also hold it up to the light so I can see that I have the cardstock straight on the impression plate.
 This is how it comes out. You can't see the Mat Stack embossing very well. It's slight. And there are some slight impression markings too which made me think a combo of foam and a layer of cardboard would help.
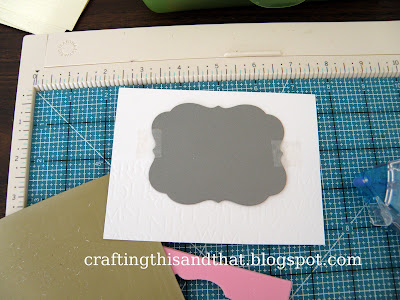 So I tape my die cutting side facing the front of the cardstock and run it through to emboss. You can hold the cardstock and die up to the light to make sure it is lined up correctly. Sandwich to emboss would be clear plate, die cutting side up, cardstock, tan mat and clear plate. And I emboss with the first tab up.
 Ta-da! It takes some playing around to find the right thickness frame but once you make it you can reuse it to make more projects. In any case, I hope this was helpful.
Thanks for reading!
My first project was posted here and actually got a shout out on PTI's sidebar! That was fun and actually made all the work and attempts worth it. But since then I've been thinking of ways to make it easier to come up with the same results. I'm a little weary of placing a metal die on top of an impression plate to emboss. I tried it very gently and it left slight scratches on the back side of my die and I'm afraid it would smash down my impression plate so I'll take the more conservative route.
I like the idea of creating a frame as found in this Splitcoast Stampers tutorial on double embossing. For my first card I must have cut up 2 cereal boxes and some corrugated cardboard too. But that was tough! But because I'm a messy kind of crafter I still have lots of stuff from previous projects lying around and I saw my fun foam. And I had this idea to use fun foam for my frame! It's a lot easier to cut and a lot easier to roll through my Big Shot. It's not perfect but passable and I had to still keep a layer of cardboard.


Thanks for reading!
Comments