
Hi! I can finally share what I made for TGF's Royalty Contest Final Four. Our goal was to:
CREATE one last "Royal" themed project using:


CREATE one last "Royal" themed project using:
Ribbon
Only TGF stamps
Your favorite color
At least ONE royal "icon"- crown, carriage, tiara, glass slipper, castle, etc. (this can be a TGF stamp, or any other brand of embellishment, papers, diecuts, etc.)
Lots of sparkle
Two different kinds of Designer Paper (at a minimum :)
Your own personal style
(warning: long post and lots of photos)
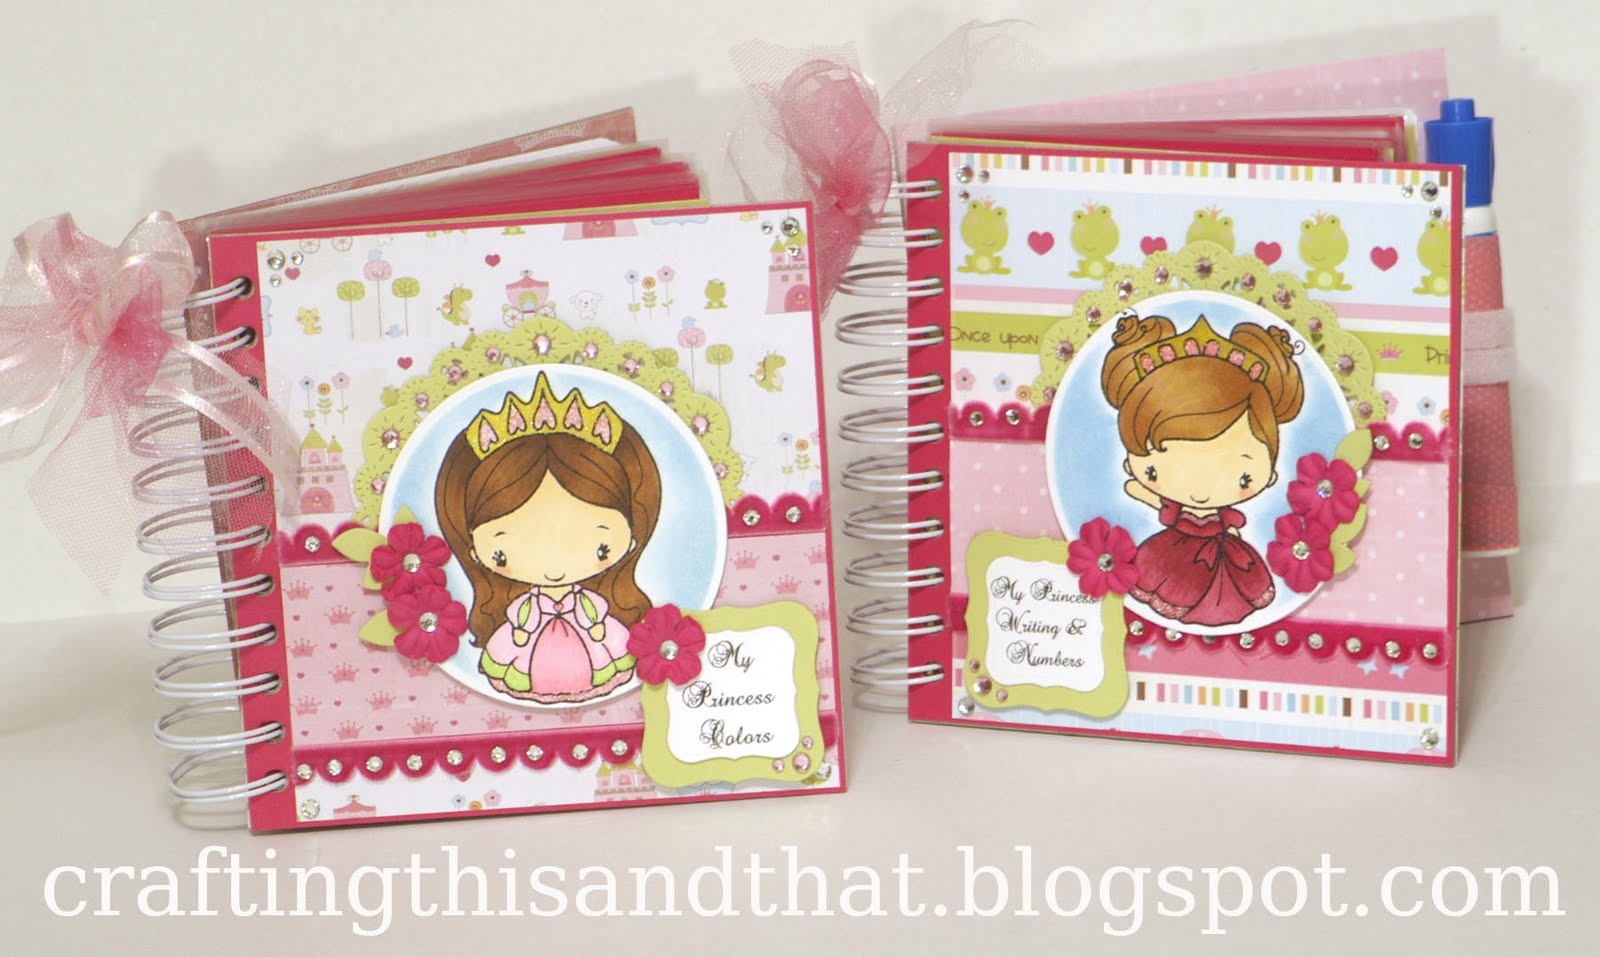
I decided to make a set of Princess themed activity books. Each one is 6x6 inches and both front and back covers are chipboard. I had this idea floating around in my head for a while. Before I became a full time stay at home mom, I worked as a speech therapist in lots of different settings but mostly I loved working with children especially toddlers. As a graduate student many years ago, I would make my own therapy materials and incorporate craft activities into my therapy sessions because kids love to craft too! And when I started working I still tried to make therapy materials that I could use over and over. So these 2 books really stem from my past experience as a therapist and my love for cute crafty things.

My first Princess activity book focuses on color. The cover follows MFT's sketch 25 with TGF's Princess #2. I used my Cinch to bind both books. Lot of bling on the covers too with some ribbon and tulle tied into a bow in the corner.

The inside. Name label on the left and the intro to the first section on the right which I called Color Match.

Little fun directions to Color Match. The pages in PTI's Raspberry Fizz (one of my favorite cardstock colors) are laminated. There is a dry erase marker that I wrapped up in washi tape to look prettier and that is attached to the book with velcro. When I worked in the schools, we laminated a lot of materials.

Fancy Anya and the frog from Down By the Pond. Each frog and the dresses on the girls are paper pieced. So I stamped 24 frogs on white then stamped 24 more frogs on various colored paper and then cut them out and glued them on. I could've colored them all but I really wanted the colors to match and save some ink in my copics.

Princess #3. I used a handwriting site HERE to print out all the words. It's a neat site because you can type in anything that you want to practice on the worksheets. I printed them out and cut them to size.
 Tuesday. So usually I don't color much black hair. Mostly it's just light or dark brown. But wouldn't you know it I ran out of ink in my 2 brown copic pens (and also my skin tone pens too)! Yes of course that would happen. I was able to find them at one of our local craft stores (J's). They always have a great sale if you donate canned goods which is such a great trade off.
 The original Princess Anya. So I had to have these laminated at Kinko's or I guess they are now known as FedEx Office. I went there at 10:30 at night thinking they could just laminate them right then for me. That's how they've done it before (years ago, I guess) but the lady actually wanted me to laminate them myself in those pouches. Ummm, that's more expensive! If I wanted the large sheet laminate then I'd have to wait til morning to pick them up. Trust me, it was difficult to let them take the pages I worked so long on. I worried they would bend the pages (and there are some tiny bent corners) I've noticed but overall I guess they did a good job.
 Fleur Anya. See that corner on the green sheet is bent! Plus they didn't even have my order ready when I went in the next morning! I had to take a trip down to another crafty store and then go back to Kinko's to pick it up. That is how I remember Kinko's though. It's great they are 24 hours but sometimes they are hit or miss. I hand cut each page out of the huge sheet laminate.
 Princess #2 again. See, told you lots of photos. Still with me?
 My second section is called Color Me Princess.
 Mermaid Anya. Basically I left these images uncolored so you can color them and then erase them and color them over and over again.
 Original Princess and Geisha Anya.
 Fairy Eva (well, I had to get that one) and Flutter Anya.
 Princess #3 waving good-bye. The next section is Drawings.
 Just cut some white pages to size for doodling. My inside pages measure 5x6 to accommodate the pen.
 The second activity book focuses on writing and numbers. The cover has Princess #3 and follows the same sketch.
 On the left is the name label and on the right the section for name writing practice. This pen is also wrapped in washi tape.
 I printed these out from that same site I mentioned above. You can make block letters or dotted letters. There are a few of these pages to practice.
 On the right is the section My Numbers.
 Dragonfly from the Sunshine Kit. Same site for these printed out numbers.
 Dresses from the original Princess Anya and Princess #3. I cut them out. Flowers from Sunshine Kit.
 The birdie is also from the Sunshine Kit and the butterfly from the Spotlight Kit.
 Fairy from Never Ever set. I cut the bows out from 80s Anya.
 The piggy from Fly Away is not really princess related but still pretty cute! I'm so glad I found him. He is holding 8 balloons and was my inspiration for making this numbers section. The wands on the right are from Princess Anya. Yes, I cut them all out! Even the skinny stick part!
 The crowns from the 3 Princesses and CC Tuesday all hand cut.
 The last section of this book is Princess Notes with some blank pages for scribbles. I really had meant for this to be one huge activity book but when I made all these pages and tried to bind them it was just too fat. So I had to decide whether to cut some sections out or make a set of books. In the end I didn't want to take anything out especially since I had all the laminating done so one huge book turned into 2 activity books.
Some last tips on laminating. I was warned by the Kinko's guy that my pages were too thick and may bubble. So maybe may skip the PTI cardstock next time. And use thinner paper. But I didn't notice much bubbling so they did do a pretty good job just had to go there 3 times in less than 24 hours.
So this was a fun challenge! I got to use more bling. I definitely will need to get more of those. Finally used some of my velvety soft scalloped ribbon too and a whole lot of my TGF stamps finally saw some ink.
Thank you so much for reading this long post and looking at all the photos which my husband worked so hard to take. I so appreciate it.
Now please go to TGF's facebook page and VOTE (5 am - 11 pm CST)! Thank you!

Comments
hugs
Doreen